Showing posts with label Progress. Show all posts

Monday, May 11, 2020

We Moved Our Driveway...

2:03 pm - 68 degrees - watching thunder clouds roll in...

We finally did it! We moved our driveway over and made a parking area that is big enough to turn a trailer around. We have been wanting to do this for a while now, and I am so excited that it's almost done – all we have left is to finish planting out all the dirt areas.

From the main driveway, you were able to see down into our place, the house, the yard, the cars, everything. In the dry summer months, when someone drove by or it got windy, the dust would roll on down into our place. So with moving the driveway over, building a burm across the old driveway entrance and planting it out, it will give us that extra bit of privacy and hopefully keep the dust out.

Last fall, Tony roughed in the new driveway and was able to get some base rock down before winter.


Then in early April Tony started cutting down trees, this was originally to expand our wildfire defensible space around the house {click here}, but it evolved into a much larger project...

After a few of the trees came down and we picked up the mess, we walked around our driveway (new and old) and started tossing around ideas of how we wanted to get rid of the old driveway entrance, and just how everything would lay out and come together. Then Tony suggested that we could take some dirt from over here and put it over there and voila, we could have a really large parking area. I said let's do it!

A few weeks went by and then I came home to a big surprise! Tony was in the excavator and a friend was in a bulldozer and they were moving a TON of dirt! I was giddy with excitement that the driveway project was actually happening!


From the time Tony started moving dirt, it took 3 and a half days (over a week and a half time period) to complete the driveway and parking area project and since Tony was able to reuse the rock from the old driveway in the new parking area, we were able to save about $2500 because we didn't need to buy rock - I really loved that part!

I could not be happier with how this project has turned out, it's even better than I anticipated. Now we just have to finish planting out all of the dirt areas.

New Parking Area
We can park cars/trucks - 6 wide, 2 deep.

Just above the row of boulders on the middle terrace, we planted some Everybearing Strawberries. I know we're taking a bit of a chance having the strawberries out in the open like that, but hopefully the deer will leave the majority of them alone and they will spread and creep around and down the boulder wall.

Everbearing Strawberries
About 6 feet behind the strawberries, is a row of Cascara trees, and right behind those are two rows of Redstem Ceanothus.

Cascara
(Rhamnus purshiana)


Redstem Ceanothus
(Ceanothus sanguineus)


Going up the back wall of the burm that blocks off the entrance to our old driveway, we have several rows of Redstem Ceanothus, followed by several roes of Western White Pine, one row of Rocky Mountain Maples, and two more rows of Western White Pines. On the very top we have a row of Cascara trees and below that, on the main driveway side, is a row of American Cranberries. We will be adding some more mature Vine Maples and maybe a few Noble Firs on the top to help block the view a bit more until everything else starts to grow up.

Western White Pine
(Pinus monticola)

Rocky Mountain Maple
(Acer glabrum)
  
American Cranberry
(Vaccinium macrocarpon)
And finally back towards the house I built a stone retaining wall to make a flower bed where we planted some Kinnikinnick.


Kinnikinnick
(Arctostaphylos uva-ursi)

Current Plant Count:
15 American Cranberries
14 Cascaras
26 Ceanothus' 
50 Everbearing Strawberries
7 Kinnikinnick
15 Rocky Mountain Maples
43 Western White Pines

In addition to all of the baby plants we are putting in, we're also going to throw down more grass seed to help stabilize all of the dirt. I am so excited, I can't wait for everything to grow up. 

Still Need To Plant/Transplant:
Evergreen Huckleberry
Kinnikinnick
Noble Fir
Oregon Sunshine
Pacific Crabapple
Ponderosa Pine
Thimbleberry
Vine Maple

Saturday, April 11, 2020

Wildfire Defensible Space...

8:29 am - 39 degrees out - clouds are moving in...

The last several days we have had sunshine! The nice weather was needed after several weeks of rain and snow. With this gorgeous weather, we have taken full advantage and have been busy outside working.

Tony cut down some more trees to help improve our defensible space around our home. A few years back we had a DNR (Department of Natural Resources) Fire Forester guy come out to look at our place and let us know how we would fare if a wildfire came through. The outcome of that visit was the knowledge that we would be on our own. We were told that ground fire crews would not be sent out due to the steepness and inaccessibility of the mountain ridge we live on. They may send out an aircraft to drop some fire retardant on our house but that’s about it. On the positive side, the DNR guy did say that we had a great start on the defensible space around our home and had the right to stay and protect it. {Click Here} to read more about that visit.

Down came six small Alder trees and one large Douglas Fir tree, and it took us two days to get it all cleaned up... 


...well almost all cleaned up.  We still have the large rounds in the driveway that need to be cut up and split into firewood.

Even though we are tired and sore from working nonstop for the past several days to get the trees down and cleaned up... progress feels good!

Friday, April 5, 2019

Landscaping The Backyard...

9:08 am - 44 degrees - raining...

It is Spring Break right now, and we decided to stay home to get some projects done around the property.

Every year after the snow melts away, we are left with a mess! There is a 14'-16' swath of rock that is scattered in the grass alongside the driveway from the snowplow and snowblower. There are broken branches and twigs scattered all over the place. And the grass and all the plants are matted down and just look blah. I cannot wait for everything to perk up and start greening up!

All this rock had to be racked back into the driveway.

Now that the majority of the snow has melted I wanted to take advantage of the time off and get some work done around the house. So this week I have been cleaning up and burning in between rain showers.

Burning yard debris.

Yesterday there was another break in the rain and I decided to get rid of one of the many rock piles we have scattered here and there - we have very rock ground. About a year and a half after we moved up here, Tony and I used up some of our excess rock to build a couple of rock stars {click here}. After we were done, we intended to transplant plants around the stars... but we never quite got around to it. So fast forward to yesterday and I decided to add a third star.

I printed off my original grid star design that I made (each star is 12'x12'), grabbed my gloves, a tape measure, marking spray paint, stakes, and twine. Next I measured out where my stakes needed to go, strung out my twine, and marked my lines on the ground with my marker spray paint. 


Then I started to fill in my star outline with rocks. I found the best angled rocks for the star points, then made my rock outline, and lastly filled in the center.


After my star was completed, I raked around all three stars and just cleaned it up a bit because this year I AM going to plant around the stars and get that flowerbed finished!


I think it turned out pretty good. The whole project took me about 4 hours, and I already had all the supplies so it cost me nothing!

Thursday, March 7, 2019

DIY Faux Shiplap Walls...


2:48 pm - 31 degrees outside - snowing, foggy...

A while back I decided that I wanted to finish out all the closets in our home with a wood planking look – aka shiplap. So far I have finished out both of the kids closets {click here} and I think they turned out great!

When I make a decision I usually jump with both feet, while Tony thinks things through a bit more. So Sunday night I decided that I wanted to finish out our linen closet in the master bathroom and tore everything out of the closet so I would have a clean space and be ready to get started the next morning... after I ran to Lowe’s to get supplies that is.

Real shiplap is more than I wanted to spend, but that’s the overall look I’m wanting in all the closets – it’s a nice neutral texture that can be added to any space and can be styled in a lot of different ways.

A popular technique to get the shiplap look at a lower cost is to cut a piece of plywood into strips that you nail to the wall just slightly spaced apart.  This will save you a few bucks, but on the down side you have to rip plywood into perfectly straight strips and balance coins or spacers between boards to get the perfect spacing which would make the project a lot more labor intensive than I wanted to attempt.


So the best solution, at a reasonable price, that I found was to use tongue and grove planks. This is what I used in the kids closets, and it is so incredibly easy to install, yet it still gives me the look I’m wanting.

Altogether - planks, wood filler, sandpaper, paint, and boards for shelving totaled $126 and the project took about 4 hours spread out over three days to finish. Three days was to give enough time for the paint and stain to dry properly – otherwise it would have been all done in one day.

Here is what I used...
Miter Saw
Tape measure
Level
Brad nailer with nails
Wood Filler
Putty knife
Sandpaper
Paint
Wood Stain


The linen closet is 44” wide by 2’7” deep with a back wall + slanted ceiling measuring 6’10” –-- soooo... there was a lot of measuring and cutting involved.

I started the first board in the bottom left corner, used the level and a scrap piece of sheetrock to keep the board half an inch off the subfloor (the spacing will allow for the future installation of flooring) and nailed in the board using the brad nailer. It took me somewhere between one and a half to two hours to get all the planking up.  


After the boards were up, I went back and filled all the nail holes and smoothed out any seams or knot holes with wood filler.  After the wood filler had time to dry, I went back and sanded all those spots smooth.  Then paint!  I used less than half a can of Valspar “Snowcap White” (one heavy coat + touch ups).


Next, I figured out where I wanted my shelves to be at, measured and screwed in sidewall supports for the shelving to sit on. I cut each board, made sure that they fit properly, then stained them with Varathane Wood Stain “Kona”. After the boards were dry, I put them into the closet, and voila, all done!


I absolutely love how it turned it. Now 3 out of 4 of the upstairs closets are done! I love progress!

Wednesday, September 20, 2017

Building A Pond...

4:50 pm - 47 degrees - foggy, raining...

When we were driving around looking for property 12 years ago, we came upon this near-perfect rural off-grid property... and we were sold!

Our property has a good amount of acreage, gorgeous views, a nice home site, and it’s a nice distance to and from civilization.  It was perfect... except for one small thing – it was missing a visible water feature.  Yes, a river bisects our lot, but we can’t see it from the house.

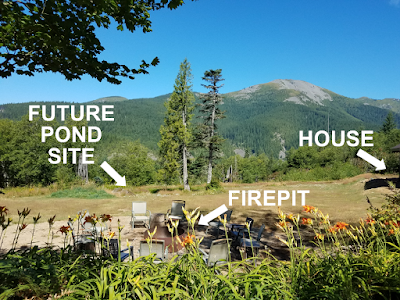
I have always wanted to live on a lake or have a large pond or some kind of water feature within sight of the house.  It's only taken 12 years, but we finally have a visible water feature – a pond!

A pond offers numerous benefits for landowners: entertainment for the family, water for wildlife, aquaculture, fire protection, erosion control, and aesthetics are but a few. 

And in our case, the pond will also hopefully offer another source of power – hydroelectric power. 

For those of you who don’t know what hydroelectric (or hydropower or hydroenergy) is – it’s a reliable source of renewable energy that runs 24/7 for very little cost.  Power is generated from the movement of water, like waterfalls or streams, water that is stored in dams, as well as flowing in river to create electricity.  The water flows through a turbine to help generate electricity; using the energy of falling or flowing water to turn the blades.  The rotating blades spin a generator that converts the mechanical energy of the spinning turbine into electrical energy that we can use to power our home.

Even though a pond has so much to offer, there are a lot of factors that needed to be considered first.  Factors like:
 - Is the land and soil actually suited for a pond?
 - Can we build the pond ourselves?
 - What size of pond do we want and what size will fit?
 - How much will this project cost?
 - How long will this project take?

While Tony is the researcher, thinker, and planner, I am one to jump in with both feet now.  So when he told me that he was thinking that he could put in a pond and wanted to know what I thought – my response was YES, the bigger the better!


After walking around the designated area he had picked out and visualizing his plan of attack, Tony started digging, and digging, and digging.


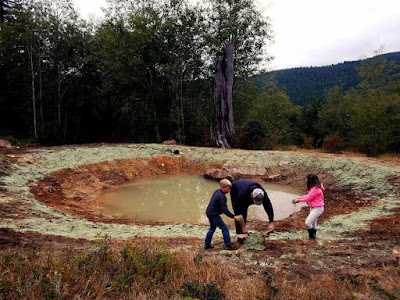
The underground springs Tony tapped into, quickly started filling the hole and eventually the big hole started to look like a pond.  Before the pond got too full, he added a 4” pipe that is about 2’ below the water line for our future hydropower source.  


Tony also added an 18” culvert for an overflow.


After getting the edges, top and surrounding area cleaned up, we spread grass seed covered with Turf Mulch.  The Turf Mulch is a naturally organic product that is a ground dressing for the newly seeded area.  It will help the ground retain moisture, form a protective mat over the seed, help the grass seed germinate quicker and help with erosion control until the grass grows in.


And we now have a 10' deep by 40'x50' trout pond!  The water level is currently at the uncapped hydro pipe, which he painted black so it would blend in a little more.  Tony wanted to keep the water at the lower level until the grass starts to grow.  The trout will be coming in about a month or so.  So excited for this project and how it is turning out!  My husband is amazing!!

Saturday, January 14, 2017

We've Started A YouTube Channel...

6:40 pm - 17 degrees - clear night - 54+ mph wind gusts...

We're constantly asked why we don't make videos or have a YouTube channel... well now we do!

It is definitely a work in progress as I'm learning how to take and edit videos.  Today I learned that I don't have any video editing software on my computer, so I put together a video on my phone - downside, the resolution isn't that great.  But hey, I edited my first video!  Yea!

{Click here} for the link to our YouTube channel.


Monday, December 5, 2016

Winter Is Here...

4:55 - 30 degrees - snowing...

Yesterday we spent the majority of the day moving and restacking firewood.  We have almost 6 cords moved and stacked with just over 2 more cords still to go.


It started snowing yesterday...


...and by this evening we have 13” of snow and it’s still coming down!


Today the kids stayed home from school and thoroughly enjoyed their first snow day.

Thursday, December 1, 2016

Graveling The Driveway...

7:24 pm - 38 degrees - calm night...

Ditches are cleaned out, and now it's time for gravel!  

This morning four dump truck loads of gravel was put onto the main driveway.  Tony spent the rest of the day grading it all out.  The driveway is looking really good!


While Tony was down working on the lower section of the main driveway, I was working around the house enjoying the falling snow flakes!  It wasn't cold enough for the snow to stick, but it sure was exciting to see!  Tony's hoping that the snow will hold off for a few more days so he can get the snowblower and snowplow mounted and running.

Wednesday, November 23, 2016

Turning Logs Into Lumber...

2:05 pm - 36 degrees - raining and foggy...

Most people get their lumber from the local lumber store or local big box store, which is what we usually do.  However, Tony wants to build a woodshed and needs larger lumber, which of course costs more.  After crunching the numbers, he saw that it would actually save us some cash to have the lumber milled out versus going and buying it at the store. 

One of the trees that was felled to make lumber.


So a couple weekends ago Tony had a local guy come up with his portable bandsaw mill to mill out some lumber for our woodshed project.  A portable mill is basically a piece of track, called the bed, on which an adjustable band saw rolls back and forth on.  You lay the log on the bed and trim slices off the log with the band saw.

After they got the portable bandsaw mill in place, it was crucial that the bed, which is the reference point for the entire mill, was level and square.  If the bed isn’t level and square, all the lumber that is produced will be slightly off. 

After the mill was all set up, it was time to load one of the 20’ logs on to the bed.  Depending on the size of the log, this can be a bit tricky.  The portable sawmill had a wench that was used to hoist the logs into place, but an excavator was used to the place the larger logs that were just too big for the wench to pull.

Cutting the end off.

The first cuts made on a log produce slabs, which is a piece of wood that has bark on one side and a clean cut on the other.  The next cut is a flitch cut, which is a board with two flat sides, but has bark on one or more edges (this is also known as live edge boards).  For the typical log, it takes about two cuts on each of the four sides – one slab cut and one flitch cut.  In theory, that will result in a large, square piece of wood called a cant.

Making the first cut on the log.


Second cut on the log.


After all four sides have been cut, they start milling the lumber.


Of course not all logs are the same.  Depending on the size of a log, eight cuts (4 slab cuts and 4 flitch cuts) can waste a lot of wood.  However, the edges of the flitch cuts can sometimes be ripped down to make a good board or the can be used at a live edge board.

Out of four 20’ logs, we ended up with four 20’ 6x12 beams, twenty-four 20’ 2x12s, four 20’ 1x12s and a pile of miscellaneous boards and live edge boards.

Left over piles of scrap and live edge boards.

Pile of scrap live edge boards.
I'm sure we can think of something to do with these!

Left over logs.

When milling your own lumber you must also be aware that you can totally ruin everything you have just milled by improper drying.  Softwoods develop fewer defects than hardwoods, partly because the total overall shrinkage is generally less.  Some warp is inevitable and you may want to saw hardwoods a bit larger to be sure you can get the final planed thickness you are wanting.

To properly dry freshly milled lumber, you must be quick and carefully sticker the boards.  Stickers are pieces of wood that provide air gaps in a pile of drying lumber.  Stickers are only ¾ x ¾ inches.  This is a great use for scrap lumber.  Using dry stickers every 16 to 18 inches or, according to some, as close as every 12 inches for hardwood lumber.  The purpose is mainly to separate wet boards and to allow air circulation, but the wood's own weight in the pile helps control warping.  Using stickers at the ends of the piles reduces end checking as well as warping.  Tony also painted the ends of the boards with anchor seal which also helps to prevent end checking.

Turning logs into lumber was definitely a learning experience. 

Tony spent one full day picking out the trees he wanted to use, falling the trees, limbing the logs, and hauling them into place along the driveway.  Another full day was spent milling those logs into lumber.  And yet another full day was spent cleaning up most of the mess and stacking the lumber.  Three days into that project and we still have several piles of unused logs, scraps, slabs and live edge boards and we have to wait until the freshly milled lumber has time to dry a bit.  

In the end, yes it did save us some cash, but it did cost more in time.