.jpg)
Friday, August 30, 2013
Monday, August 26, 2013
My Insecurity...
4:21 pm - 69 degrees - scattered clouds...
.jpg)
Ah,
yes... that great temptation to compare one’s self to others. I think if we are all honest with ourselves,
we know that we all do it in some way or another. We compare our jobs, our homes, our
education, our kids, our health, and really the list could go on. Today, I’m going to make myself vulnerable to
you and tell you where my insecurity lies – what it is that I find myself
comparing.
First
off, I want to make it clear why I am referring to comparison as insecurity. I believe that if we were each thankful,
comfortable, and confident in where we are at the moment, even if we do need to
grow and change, that we wouldn’t feel the need to compare ourselves to others.
Comparison
is simply a means of falsely lifting ourselves up to cover up our weaknesses or
to pull ourselves down to keep our expectancies of ourselves low. Unless we are able to see ourselves for what
we really are and only use it for building ourselves up and making ourselves
better, comparison is a foolish waste of time and energy.
Although
I am confident in our lifestyle, my personal insecurity lies in our home. Actually that’s only true sometimes.
Right
now I am sitting at the dining table typing away on the laptop with a view of the
mountain, which is playing peek-a-boo in the clouds. To my right there is a roaring fire in the wood
stove that is taking the chill out of the air, first time we’ve need the
woodstove in over a month, and behind me is the sound of the kids playing
nicely in their rooms. I have a feeling
of happy contentment. No
insecurities. I’m in my home that I
love. I can rock out to AC/DC while I’m
heating water on the woodstove so I can do the dishes on the dining room table...
and I’m content.
.jpg)
My
insecurity sneaks in when I’m around other people and the subject of our home
comes up, “a normal home” compared to our “off-grid home”. We’re still in the construction phase of our
home, so we’re living a minimalist lifestyle.
We don’t have a television but we do have a computer with internet; we
have to heat the water on the stove to do the dishes (which are done by hand)
or to take baths; air dry the wet hair instead of using a blow-dryer; go into
town to do laundry; if we want electricity for anything, we have to go outside
and turn on the generator. A washer
& dryer, dishwasher, TV, painted walls with pictures on them, those things
are in the plans for the future...just not the immediate future. We’re in the middle of building a house, it’s
kind of like living through a mass home renovation. Instead of our dream home being completed in
the 12-16 month timeframe that we were originally thinking, we have had to break
it down into phases... and we’re still in Phase 1 – complete the house. It all comes down to re-evaluating what the word
“need” really means. No we don’t “need”
a TV, but it sure would be nice to watch a movie on something larger than a 15”
screen.
My
insecurity storms in when we have people up for the first time, they’ve heard
stories but nothing compares to the real thing, so I find myself holding my breath
waiting for that first comment, that first impression... “Oh wow!
This is gorgeous! This place is
going to be great when it’s done!”... “Oh...? This is where you live?”... “Hmm.”... “When can I move in!?!?”... “I can’t believe you live like this.”... “You like living like this?”... “Wow! When
this place is done, it’s going to look like it came straight out of a magazine!”
Since
the start of this project nearly 8 years ago, we have had to change course a
few times, alter our expectations, deal with disappointment when we have let
our hopes get a little too high... but, we are still working on our dream
despite the occasional insecurities, lack of self confidence, disappointments, and
frustrations. Each passing year, we
stand a bit more humbled and wiser by our experiences; our insecurities lessen
and our self confidence grows.
“The reason we struggle with
insecurity is because we compare our behind the scenes with everyone else’s
highlight reel.” ~ Steve Furtick
Wednesday, August 21, 2013
Road Trip...
12:00 pm - 80 degrees - scattered clouds...
We snuck one last road trip in before this blink and you miss it summer is over and we have to get back into the school routine...and back to working on the house.
.jpg)
.jpg)
.jpg)
.jpg)
.jpg)
.jpg)
.jpg)
.jpg)
.jpg)
.jpg)
.jpg)

After a few days in Idaho, it was time to head back to our Off-Grid Home Sweet Home.
We snuck one last road trip in before this blink and you miss it summer is over and we have to get back into the school routine...and back to working on the house.
.jpg) |
| Columbia River Gorge |
We
started the trip out driving through the Columbia River Gorge; it is one of the
most scenic and breathtaking sights in the Pacific Northwest. A deep canyon that stretches over 80 miles
from east to west, with a river at its base, the Columbia River Gorge reaches
up to 4,000 feet tall in some areas and forms a boundary between Oregon and
Washington State, running from the Deschutes River through to the Pacific
Ocean. Here are a few of our stops...
Kitesurfers
in Stevenson, Washington
.jpg)
.jpg)
Maryhill
Museum near Goldendale, Washington
.jpg)
.jpg)
.jpg)
Maryhill
Museum of Art is a small museum with an eclectic collection. It is situated on a bluff overlooking the
eastern end of the Columbia River Gorge.
The building was originally intended as a mansion for entrepreneur
Samuel Hill. Construction began in
1914. Three years later in 1917 Hill
decided to turn his unfinished home into “a museum for the public good, and for
the betterment of French art in the far Northwest of America.”
Stonehenge
in Maryhill, Washington
.jpg)
.jpg)
.jpg)
Heard
of the ancient, Neolithic structure situated in the county of Wiltshire, high
on Salisbury Plain in England? Its
massive stones, fallen from age, have stirred the imagination of man for
centuries. There is nothing quite like
it; or is there?
Three
miles east of Maryhill Museum stands a full-size, astronomically-aligned
replica of Stonehenge. It was commissioned
by Samuel Hill as a memorial to those that died in WWI. The memorial was completed in 1929 and was
the first monument in the US to honor the dead of World War I.
Wind
Farms along the Columbia River
.jpg)
.jpg)
When
most people think of the Pacific Northwest they envision lush green forests and
majestic mountain ranges. The region is “green”
in more than one way. Thousands of
megawatts of green energy are being produced by numerous wind farms in the
Columbia Gorge Bi-state Regional Energy Zone (CG-BREZ); a six-county region
straddling the Columbia River in both Oregon and Washington.
The
Columbia River Gorge is designated as a National Scenic Area and wind turbines
are not allowed as they would diminish the scenic value of the gorge. But just outside of the Scenic Area hundreds
of wind turbines have been constructed and can be seen for miles. On the high bluffs east of Wishram,
Washington is the area where the wind turbines begin (due to the topography and
wind flow there are more turbines on the Oregon side of the river).
{Fun
Fact: Each wind turbines supporting tower must be 265-280 feet tall; combined
with wind turbine blades, each unit may be between 400-445 feet in height. No wonder you can see them from miles away!}
Charles
R. Scott east of Alpowa Summit, Washington
.jpg)
 |
| Charles Scott with his children Sho & Saya {photo source: Lewiston Tribune} |
We had
just passed over the Alpowa Summit and were making our way back down when we spotted
three bikers going the opposite direction.
They were biking to the top of Alpowa Summit, in 90+ degree
weather? That did not look like fun...until
the next day when I saw the morning newspaper.
Unknown
to us, we had just passed Charles R. Scott (aka Family Adventure Guy) with his
two young children Sho (age 12) & Saya (age 6) on Day 48 of their family
adventure - re-tracing the 3,200-mile Lewis & Clark Trail - 1,500 miles by
car and 1,700 miles by bike. Their goal
is to complete the trip within the 2-month school summer break. Wow! Go
check out his blog {click here}.
Made it to Idaho and we were greeted with this gorgeous sunset!

After a few days in Idaho, it was time to head back to our Off-Grid Home Sweet Home.
Friday, August 16, 2013
Last Load Of Logs...
9:40 pm - 72 degrees - scattered clouds with a slight breeze...
Several weeks ago we sent out our first load of logs on a self-loading log truck {click here}. And early this morning the self-loading log truck (with the really nice driver) returned for the last load of logs (which left a few thousand pounds shy of a full load – and yes, the trucking cost is the same regardless if it’s a partial or a full load).
.jpg)
.jpg)
.jpg)
.jpg)
.jpg)
Several weeks ago we sent out our first load of logs on a self-loading log truck {click here}. And early this morning the self-loading log truck (with the really nice driver) returned for the last load of logs (which left a few thousand pounds shy of a full load – and yes, the trucking cost is the same regardless if it’s a partial or a full load).
.jpg) |
| Unloading the trailer aka log dolly. |
.jpg)
.jpg)
.jpg) |
| Everyone finds the self-loading log truck fascinating. |
.jpg)
.jpg)
.jpg)
.jpg) |
| Off to the mill he goes. |
Logging
a small section of our property was not the intent of this project. Clearing a defensible space is {click here},
and we didn’t feel the need to remove any unnecessary trees.
Now
that Tony has finished removing all the necessary trees, the next step will be
to clean up the area... after we cut, haul, split and stack the pile of
firewood that is.
Saturday, August 10, 2013
Booming Thunder and Light Show...
10:46 am - 62 degrees - overcast...
We can get some pretty awesome storms up here, which we love to watch.
.jpg)
.jpg)
We can get some pretty awesome storms up here, which we love to watch.
Although
it was one of the best nighttime lightning shows that we’ve had up here, even though
it didn’t last very long, it was a little too close for comfort. One large bolt of lightning even struck the
mountain, which was pretty awesome to see.
While Tony
and I were enjoying the flashy lightshow and booming thunder, that occasionally
shook the entire house...the kids slept on.
.jpg)
.jpg)
Once
this foggy cloud cover dissipates a bit (the mountain is currently hiding), aircraft and fire crews will be out
roaming the area for any possible fires that may have been caused by lightning
strikes. Hopefully there are none!
.jpg)
.jpg)
Monday, August 5, 2013
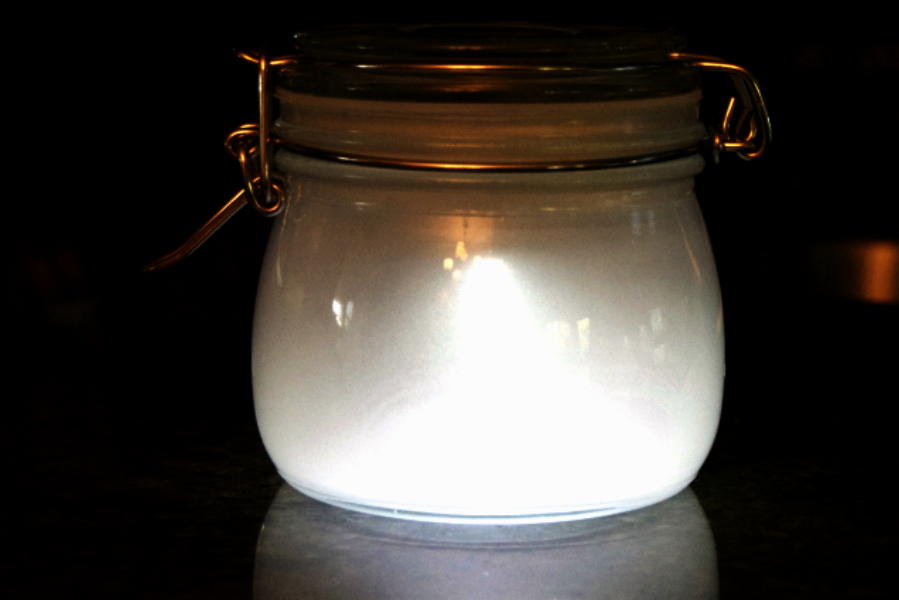
Solar Sun Jars...
8:46 pm - 72 degrees - calm, quiet night...
.jpg) Like
catching fireflies in a mason jar, these jars catch sunshine to light up the
night!
Like
catching fireflies in a mason jar, these jars catch sunshine to light up the
night!
There is no shortage of different versions of the DIY solar sun jar, but they all begin with the same basic components – a solar garden light, a glass jar, and some good old homegrown ingenuity.
For each solar sun jar you will need:
- A small canning mason jar with a clear lid
- A solar garden light (the kind that sits on a stake)
- Glass frosting spray
- Clear silicone adhesive
- Masking tape
- Newspaper
.jpg)
.jpg)
.jpg)
.jpg)
.jpg)

I was looking for a fun and practical project to do with my daughter’s Girl Scout troop at our beach campout this past weekend and this one turned out to be a huge hit with the girls!
.jpg) Like
catching fireflies in a mason jar, these jars catch sunshine to light up the
night!
Like
catching fireflies in a mason jar, these jars catch sunshine to light up the
night!There is no shortage of different versions of the DIY solar sun jar, but they all begin with the same basic components – a solar garden light, a glass jar, and some good old homegrown ingenuity.
Each
sun jar absorbs sunlight during the day through solar cells in the lid. The container will automatically come to life
at night – softly illuminating via an LED light through its hand-frosted glass –
and last upwards of 12 hours with a full charge.
For each solar sun jar you will need:
- A small canning mason jar with a clear lid
- A solar garden light (the kind that sits on a stake)
- Glass frosting spray
- Clear silicone adhesive
- Masking tape
- Newspaper
.jpg)
For
jars, I used the IKEA Korken 17 oz. glass-topped canning jar ($2.99 ea) because
honestly it was least expensive glass-topped jar I could find. The fact that it’s a weatherproof container,
and it was extremely easy to mount the solar light inside, was just an extra
bonus.
Of
course the most critical part to keeping this project easy, is finding the
right solar garden light. Look for the
ones where the solar unit is a single, compact piece on the top of the fixture. I went with a solar garden light made by
Westinghouse that I found at Target ($1.99 ea).
Once
you have your jar and solar light picked out, you’re ready to begin.
Step 1
– Mask off the outside of the jar with newspaper and masking tape.
.jpg)
Step 2
- Spray the inside of the jar with frosting spray. {Note: Frosting the jar helps diffuse the
light and gives a nice glow. Spray
outdoors, away from wind, and in a well-ventilated area; shake the can
thoroughly before spraying; and keep the can moving slowly and
continuously. Finally, use a light touch
– the paint doesn’t show up well until it dries, so have faith and add a second
coat later if you need to.}
Step 3
– Unscrew the solar unit from the bulb and stake. Run a bead of silicone around the top edge of
the light unit and secure it to underside of the jar lid. Let it dry completely.
.jpg)
.jpg)
.jpg)
And
that’s it! You now have a solar sun
jar! All that’s left to do is place it
in the direct sun for awhile (or all day), and you’ve got the perfect light for
a child’s night light (this is what we’re currently using them for), outdoor party,
camping, patios, garden, balcony or... the list really is endless.
I was looking for a fun and practical project to do with my daughter’s Girl Scout troop at our beach campout this past weekend and this one turned out to be a huge hit with the girls!
Subscribe to:
Posts (Atom)
-
 2:34 pm - 37 degrees - scattered clouds... This Crock-Pot Salsa Chicken is very simple to put together and produces amazing results! I...
 -
 12:13 pm - 48 degrees - light rain and fog... You stroll out in to the garden, picking ripe fruits and vegetables, knowing that come F...
 -
 1:20 pm - 69 degrees - blue sky and sunshine... Log reindeer are not only a fairly easy project to do, they are also cheap to make, and lo...